How to Efficiently Manage Your macOS VM Images with Packer on Orka
Streamline the way you manage macOS VM images and say goodbye to inefficient processes. Using Packer on macOS integrated with MacStadium’s Orka solution is a winning combination for development teams. Continue reading to learn a bit about Packer, its advantages, and how to use the Orka-Packer plugin to manage your macOS VM images as code.
About Packer
Packer is an automation tool for managing VM images as code that can be checked into source control. It’s made by Hashicorp, and like any other major automation tooling they produce, such as Terraform, it uses HashiCorp Configuration Language (HCL).
Benefits of managing macOS VM images as code
Efficient image standardization and creation is crucial for dev teams. Managing images as code provides several advantages for engineers, developers, and SREs. It allows the images to be checked into source control, and thus be tracked across changes.
It also allows teams to automate the process of image creation and is particularly helpful to teams with large numbers of images to manage. Packer is a preferred tool for managing images as code as it's well-established, easy to use, and interacts well with other CI tooling.
macOS Orka-Packer Plugin
Managing macOS VM images has never been easier with MacStadium’s Orka solution. Orka provides macOS virtualization and orchestration at scale in a cloud environment. With Orka’s Open Container Initiative (OCI)-compliant, thin-provisioned images, and Packer’s ability to create images as code, the two together create a recipe for success.
The Orka-Packer plugin allows teams to remotely define and create macOS Orka VM images, which can later be spun up as Orka VMs. To use the Orka-Packer plugin, you will first have to install Packer itself. You can find installation instructions for your operating system here.
Packer CLI Syntax
Packer’s CLI syntax is very easy to understand and generally adheres to the following format:
packer <COMMAND> <TEMPLATE>
To view the list of all commands, you can type packer or packer --help, but the essential commands are packer init, which installs the required_plugins you’ll see defined below, and packer build, which executes the building of the template.
Creating the Packer Template
In order to use the Orka-Packer plugin, you will have to define a Packer template file – the configuration file that defines how an Orka image must be built. You can either use JSON or HCL to create the template. Because Packer recommends using HCL, we will stick to an HCL implementation in this post. If you would rather define the image with a JSON template, you can learn more here.
To begin, we’ll create a file named hello-world.pkr.hcl. You can actually call this any name you want to but you have to make sure the file ends in the suffix pkr.hcl or Packer won’t be able to work with it.
With our new Packer template file open in a text editor, we’ll first look at each section of the file independently, and then we will put it all together in a complete example.
For the first section of the Packer template, we will add the required_plugins block.
packer {
  required_plugins {
    macstadium-orka = {
      version = "= 3.0.1"
      source  = "github.com/macstadium/macstadium-orka"
    }
  }
}
This first section of the template is used by the packer init command. It tells Packer that this template requires an additional plugin to function. Underneath the required_plugins block is the name of the plugin to use, which in turn creates a block that defines the version of the plugin and the repository to pull it from. Note, packer init only works with Orka-Packer plugin version 2.3.0 and up.
Learn more about what's new in Orka 3.0 here!
In the next section of the Packer template, we define our variables.
variable "ORKA_TOKEN" {
  default = env("ORKA_TOKEN")
}
source "macstadium-orka" "image" {
  source_image      = "sonoma-90gb-orka3-arm"
  image_name        = "packer-{{timestamp}}"
  image_description = "I was created with Packer!"
  orka_endpoint     = "http://10.221.188.20"
  orka_auth_token   = var.ORKA_TOKEN
}

Note: You can also directly set the `orka_auth_token` in the `source` block.
This second, source definition section specifies a plugin type to use (in this case “macstadium-orka”) and a label associated with the type (“image”). This means that the variables defined in this block will be passed to the “macstadium-orka” plugin with the label “image.”
You can add plugin blocks with additional labels in order to carry out parallel builds, as shown here:
source "macstadium-orka" "image-one" {
  source_image      = "sonoma-90gb-orka3-arm"
  image_name        = "packer-{{timestamp}}"
  image_description = "I was created with Packer!"
  orka_endpoint     = "http://10.221.188.20"
  orka_auth_token   = var.ORKA_TOKEN
}
source "macstadium-orka" "image-two" {
  source_image      = "sonoma-90gb-orka3-arm"
  image_name        = "packer-{{timestamp}}"
  image_description = "I was created with Packer!"
  orka_endpoint     = "http://10.221.189.20"
  orka_auth_token   = var.ORKA_TOKEN
}
It is worth noting that the variables passed above are recommended for the Orka-Packer plugin to function; however, the only required variables are source_image, orka_auth_token and orka_endpoint.
Finally, the build section of the Packer template specifies the type of build you want to perform and the type of actions to take.
build {
 sources = [
   "macstadium-orka.image"
 ]
  provisioner "shell" {
   inline = [
     "echo we are running on the remote host",
     "hostname",
     "touch .we-ran-packer-successfully"
   ]
 }
}
The sources array specifies the plugin source to use. The provisioner block is what’s responsible for running commands in the created virtual machine. Once an SSH connection is established, commands in the inline array block will be executed. In the case of the above snippet, an echo and hostname command will execute as well as creating a file called .we-ran-packer-successfully. Once this completes, the plugin will save a new image.
Continuing the example of parallel builds from above, a build section of the Packer template targeting multiple images would look like this:
build {
 sources = [
   "macstadium-orka.image-one",
   "macstadium-orka.image-two",
 ]
  provisioner "shell" {
   inline = [
     "echo we are running on the remote host",
     "hostname",
     "touch .we-ran-packer-successfully"
   ]
 }
}
Putting it all together, you should have a file that looks like this:
packer {
  required_plugins {
    macstadium-orka = {
      version = "= 3.0.1"
      source  = "github.com/macstadium/macstadium-orka"
    }
  }
}

variable "ORKA_TOKEN" {
  default = env("ORKA_TOKEN")
}

source "macstadium-orka" "image" {
  source_image      = "sonoma-90gb-orka3-arm"
  image_name        = "packer-{{timestamp}}"
  image_description = "I was created with Packer!"
  orka_endpoint     = "http://10.221.188.20"
  orka_auth_token   = var.ORKA_TOKEN
}

build {
  sources = [
    "macstadium-orka.image"
  ]
   provisioner "shell" {
    inline = [
      "echo we are running on the remote host",
      "hostname",
      "touch .we-ran-packer-successfully"
    ]
  }
}
Using the Packer image template
To initialize and download the plugin, run this command:
packer init orka.pkr.hcl
If everything worked correctly, you should see output similar to this:

To build your image, enter:
ORKA_TOKEN=$(orka3 user get-token) packer build hello-world.pkr.hcl
This should kick off the build. If everything worked correctly, you should have output similar to this:
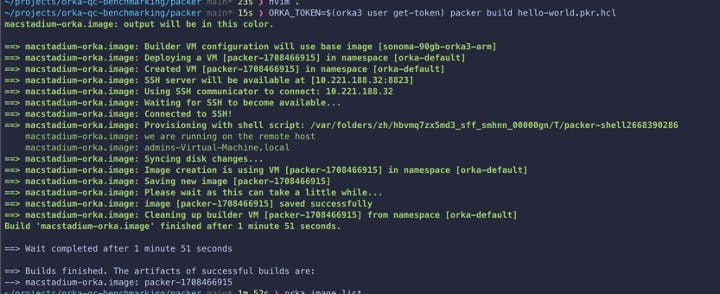
If everything was successful, you should have a new image created in Orka with your changes saved.
For additional info on using packer plugins, please view the references below.
Getting Started with Docker | Packer
Get started with Orka + Packer: How do you manage images as code?
Managing your macOS VM images with Packer can be a game-changer for your team. Using Orka to simplify your Packer image process helps you efficiently control multiple images at once.
Want to collaborate with other engineers and devs? Do you have any good tips for your peers regarding Packer and managing images? Join the MacStadium Community and let us know your thoughts.
Want to see Orka in action? Request a demo with an Orka expert today!
Share this article


Orka, Orka Workspace and Orka Pulse are trademarks of MacStadium, Inc. Apple, Mac, Mac mini, Mac Pro, Mac Studio, and macOS are trademarks of Apple Inc. The names and logos of third-party products and companies shown on the website are the property of their respective owners and may also be trademarked.
©2023 MacStadium, Inc. is a U.S. corporation headquartered at 3525 Piedmont Road, NE, Building 7, Suite 700, Atlanta, GA 30305. MacStadium, Ltd. is registered in Ireland, company no. 562354.