One of the most powerful features of Kubernetes is its ability to dynamically manage compute resources. However, this can leave users with the problem of retaining data beyond the (often uncertain) life-cycle of those resources.
For cases in which data doesn’t need to outlive a given pod, storage at the pod level will suffice. But for cases in which data must be retained beyond the uncertain life-cycle of a given pod, such as logs that are written out from iOS CI processes, Kubernetes users will need to utilize a subset of volumes – namely a persistent volume.

Unlike volumes such as emptyDir (Figure 1-A) that are defined at the pod level, and are mounted directly onto a given pod, a persistent volume exists as an independent unit of storage at the cluster level (Figure 1-B).
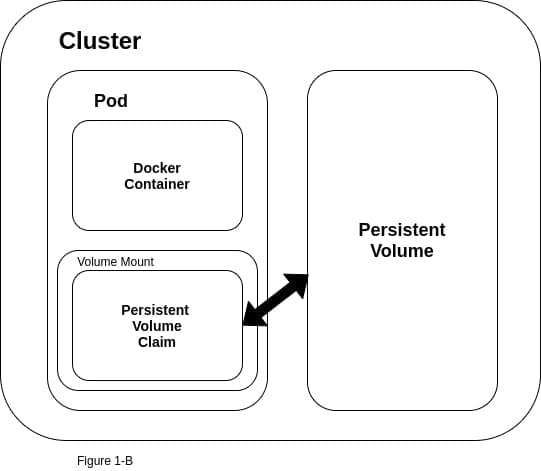
This means that the data that lives in the persistent volume will not be lost if a pod fails for some reason, and then needs to be spun up again by the Kubernetes controller.
In order to make use of a persistent volume, you will need to configure a pod to “ask” for it.
To do this, you will need to create a persistent volume claim, which can then be mounted on a pod much like other volumes.
Let’s take a look at a concrete example. The code block below defines a persistent volume (PV).
Orka users who want to use the Kubernetes Sandbox functionality will likely have a claim such as this defined by a MacStadium administrator. Orka users will then need to create a persistent volume claim (PVC) in order to mount this storage onto a given pod.
kind: PersistentVolume
apiVersion: v1
metadata:
name: chef-storage
labels:
 type: local
spec:
storageClassName: manual
capacity:
 storage: 20Gi
accessModes:
 - ReadWriteOnce
claimRef:
 namespace: sandbox
 name: pv-example
hostPath:
 path: "/mnt/data"
There are a few items worth noting in the above YAML file – the storage capacity of 20 gigs, the use of a claimRef, and the accessModes having been set to ReadWriteOnce, which means one resource can write to the PV at a time.
The claimRef acts as a means of binding this PV to a given PVC, and – by extension – a given pod, in a one-to-one pairing. This means that any request for this storage that doesn’t exceed the uppermost storage limit (i.e. 20 gigs) will get the full storage capacity of the PV. Notice that the name associated with the claimRef defined on line 15 above is the same as the name of the persistentVolumeClaim defined on line 4 in the following code block. Likewise, the accessModes must align as well.
kind: PersistentVolumeClaim
apiVersion: v1
metadata:
 name: pv-example
spec:
 storageClassName: manual
 selector:
 accessModes:
   - ReadWriteOnce
 resources:
   requests:
     storage: 10Gi  # Even though we are only asking for 10 gigs, we'll get the full 20 defined in the PV above, because we are working with a one to one pairing.
Next, we’ll confirm that the PVC has been successfully associated with the PV defined above by running the following:
$ kubectl get pvc
NAME                STATUS   VOLUME         CAPACITY
pv-example          Bound    chef-storage   20Gi

ACCESS MODES   STORAGECLASS   AGE
      RWO            manual         10m
The key piece here is that the status is bound, rather than pending. This should happen immediately, so if for some reason the status is listed as pending, chances are the PV and PVC YAML files are misaligned somehow.
Finally, in order to mount this PVC to a pod, we’ll need to define the pod along with the volume and volumeMounts, like so:
apiVersion: v1
kind: Pod
metadata:
 name: mypod
spec:
 volumes:
   - name: my-pv
     persistentVolumeClaim:
       claimName: pv-example
 containers:
   - name: mypod
     image: ubuntu:latest
     command: ["/bin/bash", "-ec", "while :; do echo '.'; sleep 1000 ; done"]
     volumeMounts:
       - mountPath: "/app-data"
         name: my-pv
Then we can simply run the following in order to spin up this pod and gain root access.
$ kubectl apply -f pv-example.yaml
$ kubectl exec -it mypod -- /bin/bash
And from there, we’ll be able to confirm that the PVC has been mounted to our new pod. Notice that we now have access to /app-data, the path at which we mounted our PVC to our pod.
$ kubectl exec -it mypod -- /bin/bash
root@mypod:/# ls
app-data  boot  etc   lib    lib64   media  opt   root  sbin  sys  usr
bin       dev   home  lib32  libx32  mnt    proc  run   srv   tmp  var
root@mypod:/# cd app-data/
root@mypod:/app-data# mkdir test
root@mypod:/app-data# cd test
root@mypod:/app-data/test# touch test.txt
root@mypod:/app-data/test# ls
test.txt
TL;DR
In order to retain data beyond the life-cycle of a given Pod in Kubernetes, you’ll have to use a persistent volume. A persistent volume exists as a separate entity at the cluster level, unlike a volume, which exists at the pod level. To make use of a persistent volume, a user will first have to create a persistent volume claim, which can then be mounted onto a pod much like any other volume.