Jenkins is still the most popular CI/CD tool in the DevOps space. As such, it is common for teams to have a Jenkins master stood up for non-Mac CI/CD workflows that they would like to add a macOS build agent to in order to run macOS and iOS C/CD jobs within their existing system.
For relatively small teams, a single Mac mini hosted by MacStadium can be an excellent solution to this problem. Today, we’ll demonstrate the process of connecting a MacStadium-hosted Mac mini to an existing Jenkins master stood up outside of MacStadium.
Initial Connection to Your Mac mini
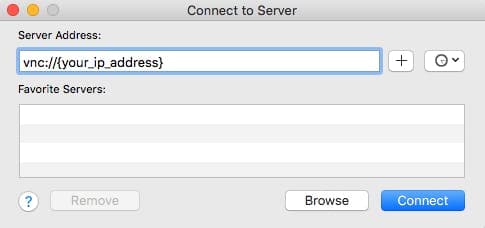
We’ll be working through the UI on our Mac mini via a Screen Sharing session to get things set up quickly. If you are working on a Mac locally, you will only need to open the Finder on your local machine, and press “ctrl + k” to open Apple Screen Sharing. If you are working from a Windows machine, check out this video for making the equivalent VNC connection.
Upon signing up for a MacStadium-hosted Mac mini, you will receive your connection details via your MacStadium Customer Portal. Simply collect those details to follow along.
Enter the following in the Server Address field, click Connect, and then enter your username and password that will also have been shared in your MacStadium Customer Portal.

Create a Jenkins User

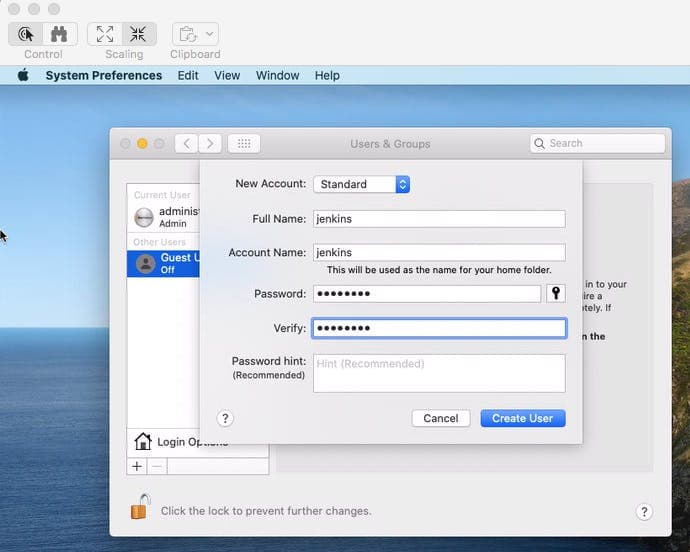
Once you have opened a VNC connection to your Mac mini, you’ll want to create a user for Jenkins to act as when it connects to your Mac mini via SSH. To do so, click on the Apple menu, select System Preferences, and click on the Users & Groups icon.
To make changes, you’ll need to click on the lock icon in the lower-left of the view that appears. Enter your credentials, and then click the “+” button to add a new user.
We’ll call our user “jenkins” and enter a password. We are choosing a Standard account type to limit the control of Jenkins when it makes an SSH connection to our Mac mini for security purposes.
Finally, click Create User.
Install Java8 on Your Mac mini
For Jenkins to be able to work on our Mac mini, we’ll need to install Java8. We’ll use Homebrew to install.
Open a terminal on the mini, and run the following to install Homebrew.
/bin/bash -c "$(curl -fsSL https://raw.githubusercontent.com/Homebrew/install/HEAD/install.sh)"
Then we can use Homebrew to install Java8, by running the following:
brew tap homebrew/cask-versions
brew cask install java8
You will very likely also want to install Xcode, and potentially additional items such as CocoaPods and fastlane, in order to execute your macOS and iOS CI/CD workflow. You can refer to the MacStadium docs for installation instructions.
Connect to Your Mac mini From Your Jenkins Master
Next, we’ll need to make sure we can SSH from the Jenkins master into the Mac mini as our new Jenkins user. From a terminal on your master, run:
ssh jenkins@{Mac_mini_IP_Address}
Enter your newly created Jenkins user password when prompted, and type “yes” to add it to your known_hosts file on your Jenkins master. When you do, a new key will be written to /.ssh/known_hosts. You’ll need to copy that key to /var/lib/jenkins/.ssh/known_hosts in order for Jenkins to have access to it. You can either do this manually via a text editor like Vim or if you are confident nothing will be overwritten, you can simply run:
cp /.ssh/known_hosts /var/lib/jenkins/.ssh/known_hosts
Add Your Mac mini as a New Node in Jenkins
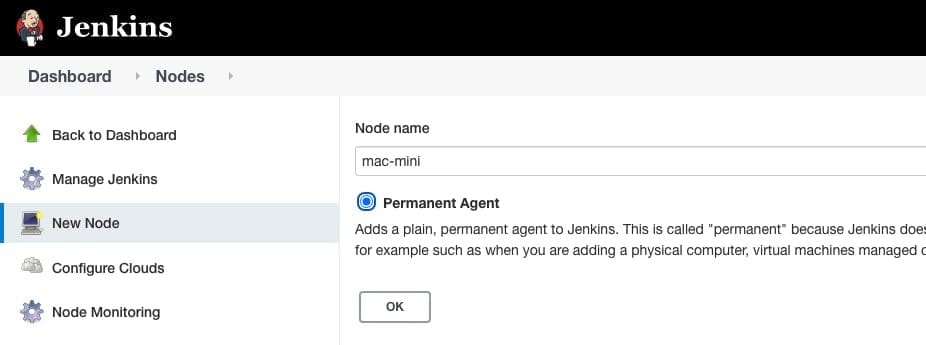
From the Jenkins UI, click Manage Jenkins > Manage Nodes and Clouds > New Node. Give your new node a name, select Permanent Agent, and click OK.

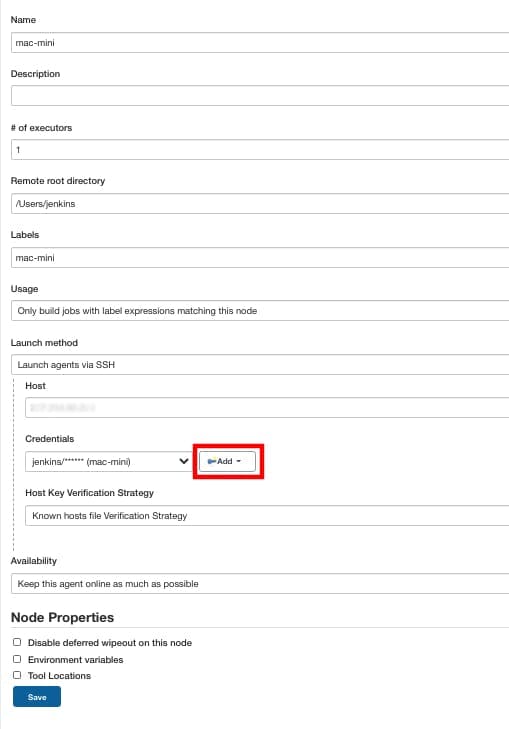
You’ll then be directed to the following view. Here, you’ll need to enter some final information in order to connect your Mac mini to your Jenkins master. You’ll need to select the number of executors – that is, the number of distinct processes that Jenkins will be able to carry out on the Mac mini at once. To optimize build times, you may want to experiment with this for your specific build(s). Generally speaking, it will be between one and four processes.
You’ll want to set the remote root directory to the home directory of our newly created Jenkins user: /Users/jenkins. We’ve also included the label “mac-mini” and told Jenkins to only run jobs with a label expression matching this on this agent.
For launch method, select Launch Agents via SSH. Under Host, enter your Mac mini’s IP Address.
Then, for Credentials, you’ll want to click Add and enter your newly created Jenkins user credentials as shown below.
Finally, we can leave the host key verification strategy as the default, “Known hosts file Verification Strategy”, because we added our Mac mini to Jenkins' known hosts file.

When you click Save in the above view, you’ll see your new Mac mini agent listed in your Nodes view. It will take a moment for Jenkins to complete the connection. You can follow its progress by checking the logs, but it should connect within less than a minute or so.

If all goes well, you will then see the system information related to your Mac mini build agent populated in the Nodes view as seen here. Now you can define a job to be run on your new macOS build agent!
TL;DR
Jenkins is still the most popular CI/CD build orchestrator in the DevOps world. Commonly, teams will have an existing Jenkins master stood up somewhere, but because macOS and iOS CI/CD jobs must be carried out on a Mac, DevOps teams need to associate one or more macOS build agents with the Jenkins master. This approach of adding a single Mac mini will work best for small teams and is a great way to get started with macOS and iOS CI/CD in an existing Jenkins system.
